

Capture for 3D: coverage first, composition later
A photograph chooses a view for someone. A 3D photo gives them room to choose their own. That changes how you capture it: stage the space, then collect the overlapping viewpoints a visitor will need.
This is the approach Twinbly co-founder Berk Frei uses in the field. A useful question is: Where will someone want to stand, and have I shown the camera what they would see from there?
You can compose an arrival view, a tour or a video preview afterward. During capture, prioritize coverage, sharp images and steady movement.
Plan the visit before you record
Decide what the scene should let someone experience. A retreat venue might need the approach, the gathering room and the view from the terrace. A rock formation might need a wide overview and a closer route around its interesting surfaces.
Walk that route first. Open doors you want people to see through, arrange furniture, remove private information and ask people to leave the capture area where practical. Keep the space as still and consistent as you can during the pass.
A scene can synthesize viewpoints between captured views. You do not have to record every exact position. But a single beautiful view cannot reliably describe the back of a chair, the room behind a doorway or the far side of a rock. Unseen surfaces and abrupt changes of viewpoint can become gaps, smears or weak areas.
Move around the subject, not just the camera
Turning in place mostly changes where you look. Moving changes what you can see around edges. Use a slow arc, a loop or connected passes through the space. Keep recognizable parts of the scene visible across successive views.
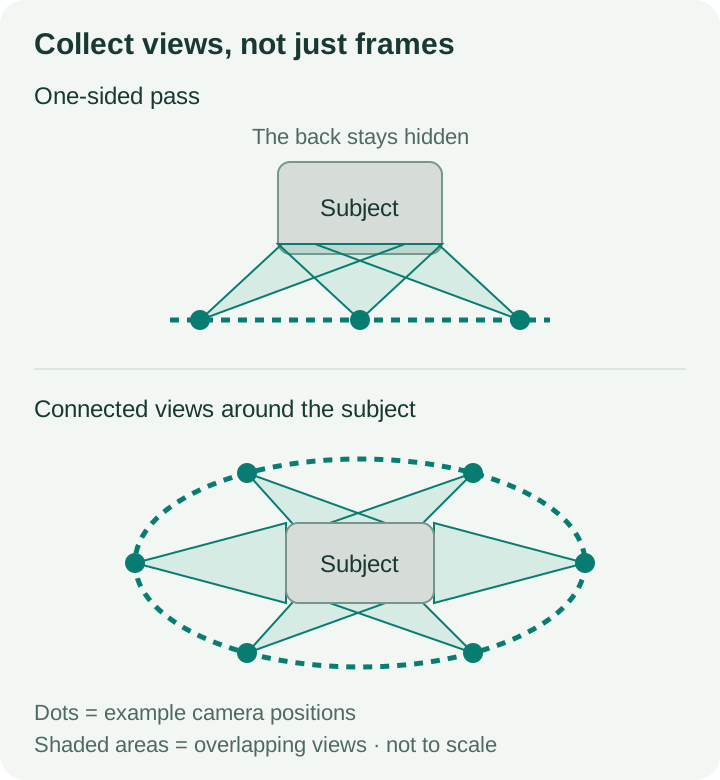
Schematic capture plan, not a reconstruction or a required camera spacing. The loop adds views of surfaces hidden from the first side.
For a room, move through safe walking positions and look toward the surfaces you want to preserve. For an object, work around it and add a higher or lower pass where that reveals something new. For a large outdoor scene, connect broad coverage with closer passes that still share recognizable surroundings.
More files are useful when they add sharp, overlapping views. Repeating nearly the same angle many times does not replace a missing side.
Bridge doorways and corners
Two well-covered rooms can still be hard to connect if there is a sudden jump between them. Capture a transition: approach the doorway, pause or slow down, move through it, then turn gradually while keeping some of the same features visible.
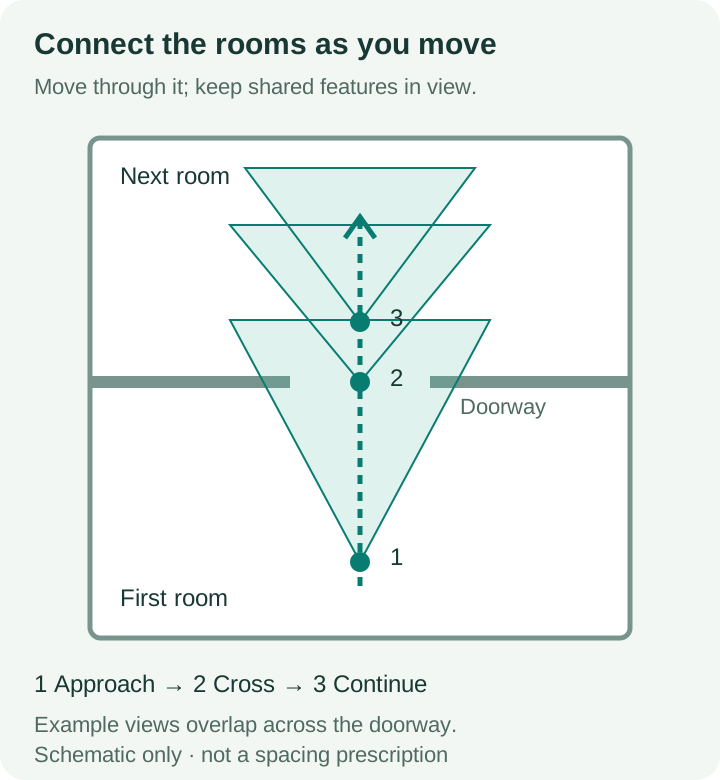
Schematic overlap bridge. Keep shared features in view while moving between spaces; do not jump straight to an unrelated view.
Use the same idea when rounding a rock, moving from a wide overview toward a detail, or joining two outdoor passes. Check the transition itself, not only the attractive views at either end.
Use a wide lens when it helps
Berk often chooses 0.5× on his iPhone because the wider view includes more surroundings and makes it easier to maintain overlap while moving. If your phone offers a wide lens, it is a useful starting point for rooms and spaces where you cannot step back far enough.
That is a field preference, not a universal setting. In poor light, another camera on your phone may give cleaner, sharper images. Inspect a few frames before committing to a long recording. Wide coverage cannot compensate for motion blur or detail that is too small in every image.
Keep the lens and zoom consistent during a continuous pass where possible. Add a closer pass for important details, with enough surrounding context to connect it to the wider capture. For a 360 recording, the camera already sees all around you—but you still need to move to reveal hidden surfaces.
Coverage does not mean rushing
Move slowly enough that individual frames stay sharp. Favor steady light, avoid sudden exposure changes and watch for moving people, leaves and reflections. A mirror can show a different apparent scene as you move; glass and featureless walls remain difficult subjects.
Try this quick check before leaving:
- Can a visitor approach the important parts from the positions you intended?
- Did you capture the sides, heights and recesses that matter?
- Do adjoining passes share recognizable features?
- Are representative frames sharp, including during turns and doorway transitions?
- Have you kept the original files and any matching location sidecars?
You are collecting evidence of the space, not just footage that looks good in playback. If the recording looks cinematic but skips a doorway or the back of a subject, add the missing coverage while you are there.
Choose the workflow after the capture plan
For an ordinary phone recording or a set of photographs, start with processing workflows. For a large geotagged photo capture, read the MegaSplats guide. Supported drone video can also carry GPS through a matching DJI SRT sidecar; the MegaSplats guide explains how this differs from a photos-plus-video job.
Keeping originals gives you options for future preparation or a new processing run. It does not mean the web Sharpen action automatically goes back and extracts more frames. Read when Sharpen helps and when it does not before planning an upgrade around it.
Compose the experience afterward
Once the scene works, choose the view you want someone to see first. Straighten and prepare it, build a tour, add marks and media, then publish or embed it.
Composition still matters. You have moved it to the stage where you can direct attention inside a space that people can also explore for themselves.